This are instructions on how to downgrade your original iPhone from 2.0 to 1.1.4.
You will want to perform this tutorial if you accidentally updated to the 2.0 firmware or you just rather be on 1.1.4.
To follow this tutorial you will need to have iLiberty (Windows, Mac), iTunes 7.5 (Windows, Mac), and the 1.1.4 firmware.
Step One
If you have Windows, uninstall iTunes 7.7 as well as Apple Mobile Device
Support and then reboot your computer. Go to your Control Panel and use
Add/Remove Programs or Programs and Features(Vista) to do this!
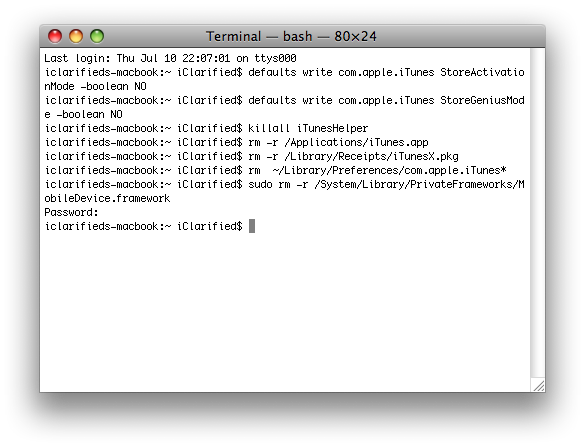
If you have Mac OS X, open Terminal from Applications:Utilities. Enter the following commands into the Terminal window:
defaults write com.apple.iTunes StoreActivationMode -boolean NO
defaults write com.apple.iTunes StoreGeniusMode -boolean NO
killall iTunesHelper
rm -r /Applications/iTunes.app
rm -r /Library/Receipts/iTunesX.pkg
rm ~/Library/Preferences/com.apple.iTunes*
sudo rm -r /System/Library/PrivateFrameworks/MobileDevice.framework
Step Two
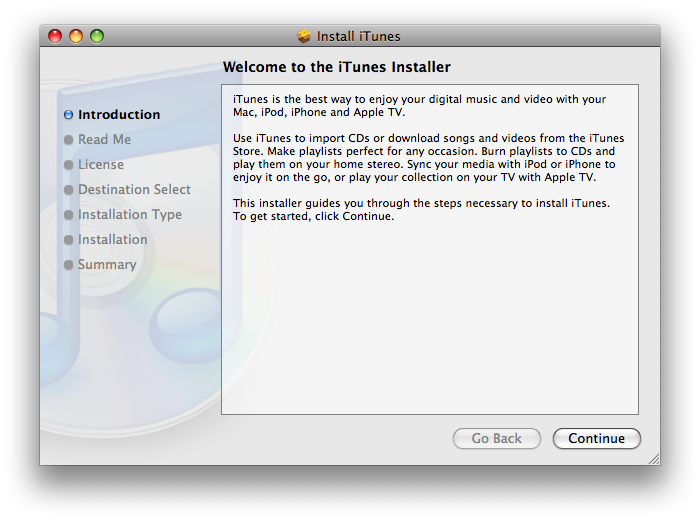
Install iTunes 7.5 onto your computer using the download links provided above.
Step Three
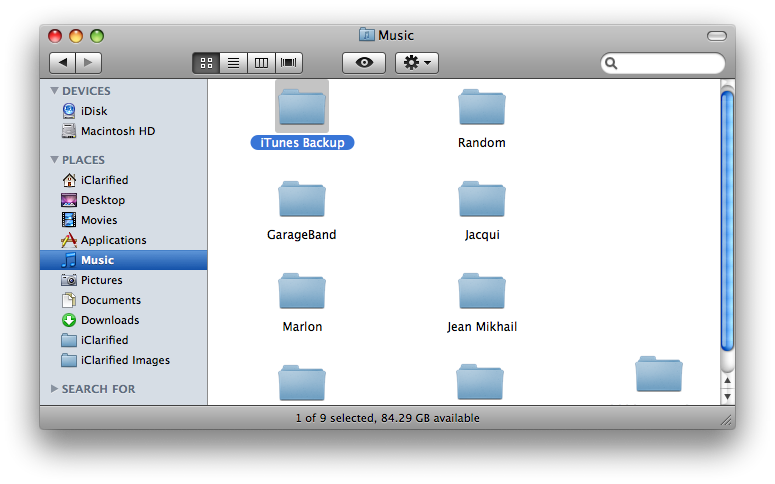
Before attempting to launch iTunes 7.5 for the first time you need to delete or rename the iTunes folder.
Windows:
Rename the C:\Documents and Settings\**your user name**\My Documents\My Music\iTunes folder to iTunes Backup.
Mac OS X:
Select the iTunes folder in your Music directory and rename it iTunes Backup. You press the Enter key to rename a file in Mac OS X.
Step Four
Launch iTunes by selecting its icon in the dock.
Step Five
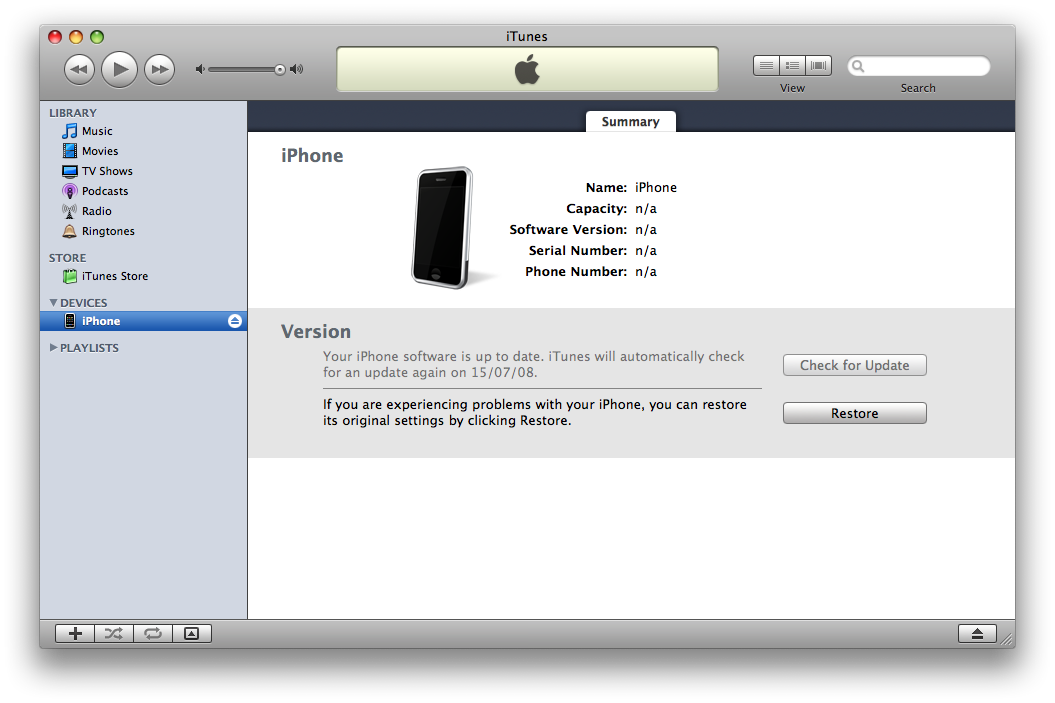
Put your iPhone into DFU mode by following these instructions.
Step Six
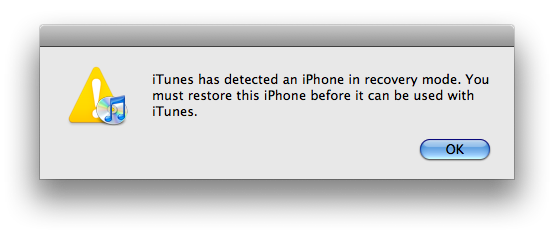
iTunes will notify you that it has found an iPhone in recovery mode. Click the OK button.
Step Seven
Hold down Option and press the Restore button. If you are using Windows hold down Shift and press the Restore button.
Step Eight
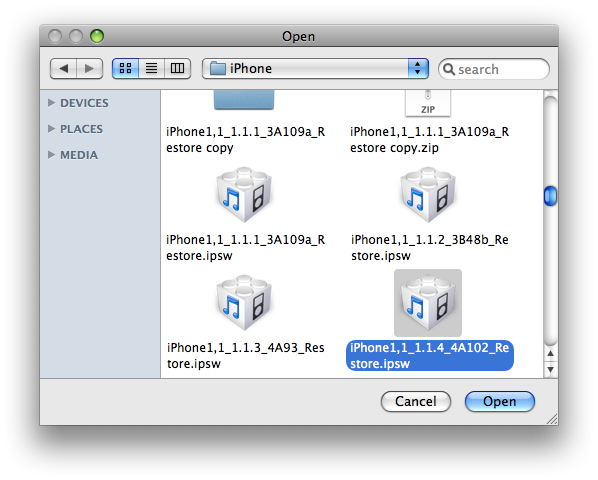
Select the iPhone 1.1.4 firmware file you downloaded earlier and click the Open button.
Step Nine
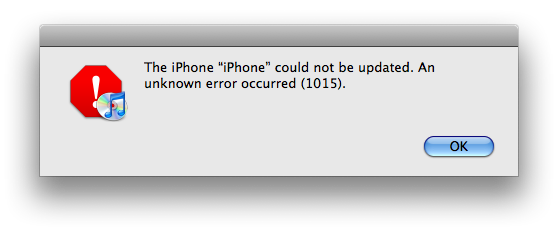
Once the restore has completed you will get a 1015 error or similar.
If you get an error in the 1600s then try putting the iPhone into DFU mode
and try again. You might also want to try a different USB port, remove
your SIM card and then restart your system and if all else fails use a
different computer!
Step Ten
Now you can use your favourite unlocking method to kick your iPhone out of restore mode and unlock it.
Below are some instructions to help you with the more popular methods;
however, I would suggest using PwnageTool as it will downgrade your
baseband.
Windows: iLiberty+, WinPwn
Mac: iLiberty+, PwnageTool
NOTES***
The first time I tried this I opened iLiberty+ with iTunes still open. It
immediately kicked my phone out of recovery mode and then the
application closed down. I reopened it and then was able to unlock
successfully on my first attempt.
IMPORTANT***
PwnageTool will downgrade your baseband. There is no reason to use an alternate tool do perform this function but if you must... Here are instructions to use KiPhone to downgrade your Baseband.
Step Eleven
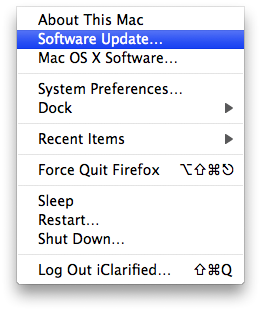
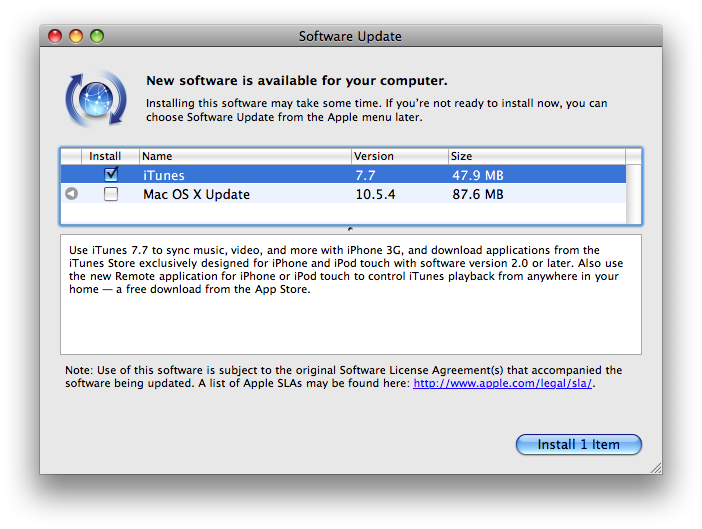
Select Software Update from the Apple Menu at the top left hand corner of your screen.
Select iTunes 7.7 from the list of software available for install and click the Install 1 Item button.
For windows users just reinstall iTunes 7.7 from the Apple website here
Step Twelve
Once installation of iTunes 7.7 has completed you can rename the folder iTunes Backup created in Step Three to just iTunes. You will then get your library back!
Thursday, July 24, 2008
iPhone | How to Downgrade Your 2.0 iPhone to 1.1.4



Windows XP Tips and Trick
Some of us just don't like to use this IM program. I myself have looked
in the Add/Remove Program panel and can't find any way to remove it there. I found out how to do it with a little research. Just go to Start->Run and type in rundll32 setupapi,InstallHinfSection BLC.Remove
128 %SystemRoot%\INF\msmsgs.inf and hit ENTER. Do a copy and paste to avoid typographical errors.
002. Remove Internet Explorer Completely - All version
of Windows Microsoft said that removing IE may make Windows unstable because it has key components that makes Windows function properly. Well, there is a way to remove it completely. Go to this site and get IEradicator. Many people have used it before and removed IE with no problems afterwards.
003. Shutdown Windows Faster
All versions of Windows have the same problem. It usually takes a little
longer to shutdown when you have the Exit Sound enabled. To disable this go to Start->Settings->Control Panel->Sounds and Audio Devices->Sounds. Scroll down and look for Exit Windows. Click on it once and then under Sounds, choose None. You should see faster shutdown times.
004. Clean out files in Prefetch Folder
There are files located in the Prefetch folder (C:\Windows\Prefetch) that you may safely delete. These files are usually left there by other programs that were using. You can either manually delete them or use this batch file that I created to do it. All you need to do is unzip the file called prefetch.bat into your Desktop and then double click on it. You will see the command prompt come up shortly and disappear. That's it.
005. Remove temporary files from Temp Folder
You may have noticed that .tmp files appear in the Temp folder (C:\Windows\Temp). You may delete these files. Since these files might be accessed by another program, it's a good idea to delete these when you don't have any programs open. It's best to do this right after you login to ensure that no programs are using it. If you don't want to bother going into that folder every time to delete it, you can download xp_downloads.zip which contains a file called del_temp.bat. Just extract that file and double click on it to run it.
006. Add programs/folders to SendTo menu
When you right click on a file/folder and choose SendTo, you will get a list of programs/folders to send it to. Let's just say that you want to add or delete one of your own programs/folders. This could be accomplished
very easily. Just navigate to C:\Documents and Settings\your_username\SendTo. In this folder you may add or delete any program/folder shortcuts. All you need to do is right click on the program you want to add, and drag and drop (choose Create Shortcuts Here) it into the SendTo folder.
007. Make XP stop displaying zipped files as folders In XP, zipped folders could be viewed just by opening up the file. If you have a third party zip program that you want to use instead of the built in one by XP, you can stop XP from displaying the zipped files as folders. This may also be useful for those who are on a slow PC and don't want to open zip files using XP's built in zip program.
To disable this in XP, go to Start->Run and type in regsvr32 /u zipfldr.dll. You may just copy and paste the command into the Run menu. If you want to undo it, just type in regsvr32 zipfldr.dll.Zip away.
008. How to Create a Password Reset Disk
Windows XP allows you to create a password reset disk, just in case
you forget the password and can't login. This is only for computers that are not on a domain. Those that are on a domain may or may not work the same way. Go to Start->Control Panel->User Accounts and click on your username. Under Related Tasks on the left pane, click Prevent a forgotten password. A wizard will show up. Click next and then insert a floppy disk into your floppy drive and choose to save the reset disk on the floppy.
Enter your current password and then click Next and Finish. The floppy will
now contain your encrypted password. If you forget your password, you can just use the Password Reset Wizard to create a new one. Just make sure to create another reset disk once you changed your password. So if you forgot your password and changed it to a new one, create another reset disk by repeating the above procedure again.
009. Set User Logon Hours
You can restrict a certain user to only use the computer at a certain
time interval. Let's say you have a username called Bill and you want Bill to access the computer only from 9AM - 9PM from Monday through Friday. You can do this by going to Start->Run and type in net user Bill /time:M-F,9am-9pm. For 24-hour time, you can replace the time with 09:00-21:00 instead. This will only allow the user to login during those hours on those days.
010. Disable XP Messenger Service
Disable the messenger service built into Windows XP to prevent ads
or other popups from coming up when using Outlook (and maybe even Outlook Express). Anyway, just disable it for better performance. To disable it, right click on My Computer->Manage->Services and Applications->Services and right click on Messenger and choose Stop.
This will stop the service. There may be cases when the Messenger
Service is required for some programs to run properly, so if that's the
case, I would set it to Manual instead of Stop.
011. Customize SendTo Menu - All versions of Windows
Have you ever wanted to use some other program to open up a certain file but had to go through My Computer->Program Files and then click on the program's folder and then the program itself. You can open a file with any programs you have with ease by adding them to the SendTo menu. You know, when you right click on a file and choose Send To. To do this, go
to Start->Run and type in send to to open up the SendTo folder. Now go to My Computer->C: Drive->Program Files and open up any of the program folders you want. Then right click on the individual programs and drag it to the SendTo folder and choose Create Shortcuts Here. Do that for each
program you want to be listed there. The next time you right click on a file and choose Send To, you should see those programs listed there.
012. Disable Personalized Menus
Some XP users might not like the personalized menus that XP has. One example of this feature is the highlighting of newly installed programs in the Start Menu. Some users might find this annoying. To turn this feature off right click on the Start Button->Properties->Start Menu tab->Customize->Advance tab->uncheck Highlight newly installed programs. Click OK. Now when new programs are installed they shouldn't be highlighted.
013. Using XP System Restore
One important feature in XP is System Restore. This makes a backup
of your data. To create the restore points go to Start->All Programs->Accessories->System Tools->System Restore. Click Create
a restore point and click Next. Type in a description for the restore point and click Create. You're all set. If your system fails for some reason you may use the restore point by hitting the F8 key repeatedly during boot time until a menu comes up. Choose Last known good configuration. This will restore everything to the last time when everything was working ok. It's using the most recent restore point that you created. If you can get into Windows XP, you can go to Start->All Programs->Accessories->System Tools->System Restore.
014. Clear System Restore Points
System restore points can take up a huge amount of space due to
the many restore points created. You can delete all these restore points by right clicking on My Computer->Properties->System
Restore and check Turn off System Restore on all drives. Then make sure to create them again manually for each drive using the method above (Using XP System Restore). That will get rid of the older restore
points and leave you with the new and updated one.
015. Disable/Remove Hibernation Mode
The hibernation file which allows a user to use hibernation mode takes
up a lot of space. If you use this feature you are allocating/creating space
so that when you come back everything (programs and folders) are still open. If you don't use it that much then there's not much sense keeping it. So you may remove it. Go to Start->Control Panel->Power
Options->Hibernate tab and uncheck Enable hibernation. That should remove the actual hibernation file. You may double check by doing
a Search (F3 key) and search for hiberfil.sys in
the C: drive. It shouldn't be found, but if it is, you may safely delete it.
016. Disable Indexing Service
Speed up XP by turning off the Indexing Service for your hard drive.
This feature is used to make your searching needs faster, but it's affecting the overall performance so it's best to turn it off. Go to My Computer and right click on the drive that you want the feature to be disabled. Choose Properties and uncheck the box where it says Allow Indexing Service to index this disk for fast file searching. When a box come up choose to Apply to all folders and subfolders.
017. Rename Multiple Files
This is something new in Windows XP - renaming multiple files. Let's
say you have a huge photo collection and want to name them in sequential order. You can do this very easily. Just select all the photos you want to rename (you may use the ctrl key and click on individual files if desired). Then hit the F2 key and type in the name of the file. Hit Enter. It should all rename. So if you entered VacationPhoto, you will have VacationPhoto (1), VacationPhoto (2), VacationPhoto (3), etc.
018. Reinstall Windows XP Without Repeating
Online Activation
This has probably happened to most of us already. We have XP installed already and when we reinstall it, we are asked to go online and activate it again. You can avoid doing that by backing up a very small file that has the activation information. Before you do this, keep in mind that your hardware should be the same as before when you activated in order for this to definitely work. Go to C:\Windows\System32 and look for wpa.dbl.
Copy that file to a floppy. After you finished reinstalling XP, just rename
the current wpa.dbl file in C:\Windows\System32 to something like wpa.old.
Ten Rules for Being Human
by Cherie Carter-Scott
1. You will receive a body. You may like it or hate it, but it's
yours to keep for the entire period.
2. You will learn lessons. You are enrolled in a full-time
informal school called, "life."
3. There are no mistakes, only lessons. Growth is a process of
trial, error, and experimentation. The "failed" experiments are as much
a part of the process as the experiments that ultimately "work."
4. Lessons are repeated until they are learned. A lesson will be
presented to you in various forms until you have learned it. When you
have learned it, you can go on to the next lesson.
5. Learning lessons does not end. There's no part of life that
doesn't contain its lessons. If you're alive, that means there are
still lessons to be learned.
6. "There" is no better a place than "here." When your "there" has
become a "here", you will simply obtain another "there" that will again
look better than "here."
7. Other people are merely mirrors of you. You cannot love or hate
something about another person unless it reflects to you something you
love or hate about yourself.
8. What you make of your life is up to you. You have all the tools
and resources you need. What you do with them is up to you. The choice
is yours.
9. Your answers lie within you. The answers to life's questions
lie within you. All you need to do is look, listen, and trust.
10. You will forget all this.
Wednesday, July 23, 2008
MozBackup
What's MozBackup?

MozBackup is a simple utility for creating backups of
Mozilla Firefox,
Mozilla Thunderbird,
Mozilla Sunbird,
Flock,
SeaMonkey,
Mozilla Suite,
Spicebird and
Netscape
profiles.
It allows you to backup and restore bookmarks, mail, contacts, history, extensions, cache etc.
It's an easy way to do Firefox backup, Thunderbird backup ...


MozBackup is compatible with:
- Firefox 1.0 - 3.0
- Thunderbird 1.0 - 3.0 Alpha 1
- Sunbird 0.3 - 0.8
- Flock 1.0 - 1.1
- SeaMonkey 1.0a - 1.1
- Mozilla Suite 1.7 - 1.7.x
- Spicebird 0.4
- Netscape 7.x, 9.x
This program is freeware and works on Windows 98/ME/NT/2000/XP/2003/Vista.
It's developed in Czech republic.
 News
News
June 8th, 2008
Donate MozBackup Development! MozBackup is distributed as freeware
and I work on this software in my free time. If you like this software
and want to support next development you can make a donation. Click on
button Make A Donation on the left side and donate via PayPal. Thanks to all supporters.
May 24th, 2008
MozBackup has new logo! I was looking for new logo for a long time. Now I can introduce new logo which will come
with next version of MozBackup. Author is Miro Pavelka from gLabs.

May 17th, 2008
MozBackup 1.4.8 released! This version newly supports Mozilla Sunbird, Flock and Spicebird. You can create automatic backups via command line
and create backups of applications like Firefox/Thunderbird Portable.
If you use Firefox 3.0, please upgrade to this version. See Changelog, Download.
April 27th, 2008
MozBackup 1.4.8 Beta released! This release doesn't contain any new features, just bugfixes. See Changelog,
Download.
March 16th, 2008
MozBackup 1.4.8 Alpha released! It's a long time
since last release, isn't it? I have one good information for you, I'm
working on MozBackup 1.4.8 which I want to release before Firefox 3.0
Final. Today I have released alpha version which comes with
some new features. Here are some of them:
- Support for Mozilla Sunbird, Flock, Spicebird, Netscape Navigator 9.0 and Netscape Messenger 9.0 (yes, I know, they are unsupported from Netscape side)
- Support for Firefox/Thunderbird Portable
- Automatic backup via command line. (documentation will be soon)
- Support for backup unknow files from user profile.
- New installer based on Nullsoft Installer.
- Support for SeaMonkey 2.0 profiles location.
- ... and many more. See changelog.
As you can see this is a alpha version. So please use only for test and report me any bugs which you find.
I'm trying to have MozBackup 1.4.8 best release since version 1.0. Thanks! Download MozBackup 1.4.8 Alpha.
source: http://mozbackup.jasnapaka.com/
101 Design resource sites

101 Design resource sites
As
a graphic designer, the practice of prowling the web for the latest
trends, tips and tricks is a common one. Here we have composed a list
of common resources we use. The primary focus of this list is
inspiration, it can come from a photograph, font, or a website. The
secondary focus is improving your design skills, which can be done by
keeping up to date with tutorials and reading other graphic design
blogs. We hope you enjoy our personal list of
great sites, and we will be adding to this list in the coming weeks and
months as there are a lot of great new sites coming online every other
day now.
Free Font Downloads
Free Fonts and Other Resources: Web Page Publicity
Huge Collection of Free Fonts: Da Font
Nice Selection of Free Fonts: Urban Fonts
Fonts and Other Freebies: Simply The Best Fonts
1001 Free Fonts for Download: 1001 Free Fonts
Over 9000 Free Fonts: Creamundo
A Small List of Free Fonts: Best Free Fonts
Paid Font Sites
A Large Selection of Fonts for Purchase: My Fonts
Quality Fonts for Purchase: Veer
Information and Fonts for Purchase: Fonts
Font Resources and Sales: Font Haus
Stock Photos and Vectors
The Best Stock Photo and Vector Website: iStockphoto
Quality Photos for Purchase: Shutterstock
Stock Photos and Other Pay Downloads: Veer
Quality, Affordable Vectors for Purchase: Vector Stock
Stock Photos With a Great Selection: Jupiter Images
Stock Photos and Photography Network: Stock Vault
Quality Stock Photos: Corbis
Free Photos and Vectors
Submit Vectors or Download Others for Free: Open Source Vector Art
Tons of Great Free Vectors and Photos: Deviant Art
59 Pages of Free Vector Art: Free Vectors
Large Gallery of Free Vectors: Vecteezy
Quality Vector Downloads: Vector 4 Free
Neat Collection of Free Photos From Around the World: Free Stock Photos
Great Collection of Free Vectors and Resources: You The Designer
Great Free Stock Photos: Free Foto
A List of Free Downloads: Bittbox
700 Free Stock Photos: Free Picture Click
Website Templates
A Few High Quality Wordpress Themes: Evan Eckard
Over 2000 Free Web Templates: OSWD
A Small Selection of Nice Templates: Open Source Templates
A Large List of Free Templates: Free CSS Templates
Nice Wordpress Templates for Download: Free CSS Templates
A Combination of Free and Pay Templates: Free Templates Online
Affordable, Quality Templates: Templamatic
Free Blog Templates: Blogging Themes
CSS Galleries
The Best Sites on the Web: CSS Remix
A Frequently Updated Gallery of Sites: CSS Mania
An Organized List of Nice Sites: Most Inspired
CSS Gallery of Quality Sites: CSS Design Yorkshire
A Selection of Only Nature Based Sites: CSS Nature
A Selective List of Well Designed Sites: Web Creme
High Quality CSS Showcase: CSS Tux
Nice CSS Websites: The Designed Tree
A CSS Collection Organized by Category: CSS Elite
Inspiration
A Great Site About Everything Type: I Love Typography
An Incredible Illustrator: Burst of Beaden
A Great Designer and Illustrator: Fully Illustrated
Customizable List of Design Resources: Cork Dump
The Society of Graphic Designers of Canada: GDC
Freelance Advice Blog and Resources: Freelance Switch
Amazing Collection of Logos: Logopond
Stunning Desktop Wallpapers: Desktopography
A Graphic Design Magazine: Computer Arts
Tutorials
The Best Photoshop Tutorials: PSD Tuts
A Talented Photoshop Designer: Abduzeedo
Photoshop Tutorials and Web Design Resources: Web Design Library
Tutorials for Photoshop, Illustrator and More: Tutorial Vault
A Few Neat Illustrator and Photoshop Tutorials: Design Spice
Great Photoshop Tutorials and Downloads: PS Wish
Tutorials for Every Computer Program: Tutorialing
Free Photoshop Downloads
A Couple Free Patterns for Download: Design Spice
Free Photoshop Brushes: Design Fruit
Free Photoshop Actions: Visual Blast
Tons of Free Photoshop Brushes: Brusheezy
A Few Nice Free Photoshop Brushes: Obsidian Dawn
Great Grunge Brushes and Others: Photoshop Brushes
Free Background Patterns for Photoshop: Free BG
Over 150 Free Background Patterns: Squidfingers
Design Blogs
A Frequently Updated Design Blog: Veerle’s Blog
A Design Magazine and Blog: Smashing Magazine
A European Design Blog: Design In Europe
A Unique Nerdy Blog: Design You Trust
The Personal Blog of a Graphic Designer: Larissa Meek
A German Design Blog: David Hellmann
The Blog of a Canadian Geek/Model: Mostly Lisa
A Graphic Design Blog: Bittbox
A Blog About Freelance Graphic Design Advice: Freelance Switch
A Design Blog Full of Resources: You The Designer
A Popular Design Blog: Fazai 38
Colour Palettes
A Flash Site of User Generated Colour Palettes: Adobe Kuler
Using Colours From Photos: Colr
Colours, Palettes and Patterns: COLOURlovers
A Colour Palette Generated From Your Images: Color Palette Generator
See The Results of Your Palette on a Website: Color Spire
Create and Email Colour Palettes: Color Blender
Tips and Tricks
Vector Do’s and Dont’s: iStockphoto
The Web Design Polish: PSD Tuts
Promote Your Design Business: Freelance Switch
How To Increase Web Traffic: You The Designer
Coders
Quality Programming: XHTMLized
Professional Web Slicing: PSD Slicing
XHTML in 24 Hours: We Use Scissors
Affordable, Quality Coding: PSD2HTML
From Design to Code, Quick and Cheap: Front Enders
Designer Geek Merch
Great Nerdy Clothing and Accessories: Veer
Nice T-Shirt Collection: Design Loot
Graphic Design T-Shirts and Accessories: Cafepress
Geek Merchandise For Everyone: Think Geek
Graphic Design T-Shirts: Zazzle
Unique T-Shirt Designs You Can’t Find Anywhere Else: Allmightys
http://www.studio7designs.com/blog/101-design-resource-links/
Fix a scratch on the LCD Screen

Every few years, the standards that are associated with computer
peripherals change. For example, the previous CD-Rom standards were
upgraded to CD writers, then it became DVD drives and the now, the
accepted standard are DVD writers.LCD monitors are the new standard in
computer displays. Though they have not yet replaced CRT (cathode ray
tube) monitors completely, LCD monitors are fast rising in popularity
because of their extremely sleek looks, lower power consumption and
more convenient footprint on a desk.
LCD monitors at this point are still quite expensive though and
thus, extra care should be given to the unit so that it will maintain
its pristine condition.
Probably the most important part that should be taken care of in an
LCD monitor is the screen itself. The screen is not as tough as the
glass tube of a CRT. If you have an LCD screen you will notice that
only a clear, thick plastic separates your fingers from the actual
components of the LCD. It is imperative that you take care of your LCD
screen as much as possible and prevent it from being scratched.
There is a way though of repairing a scratched LCD screen though
that is inexpensive and very easy. All you need is Vaseline petroleum
jelly to fill the scratch on the LCD screen. This very simple remedy
works because the optical density of Vaseline more closely matches the
LCD face compared to air.
All you need to do is to clean the surface of the screen and then
take some Vaseline and fill the scratch with it. Gently wipe off the
excess Vaseline taking care not to wipe too forcefully so that you
leave some inside the scratch.
Source: http://www.pcextreme.net/style/fix-a-scratch-on-the-lcd-screen/